25 October 2007

Banana Bread


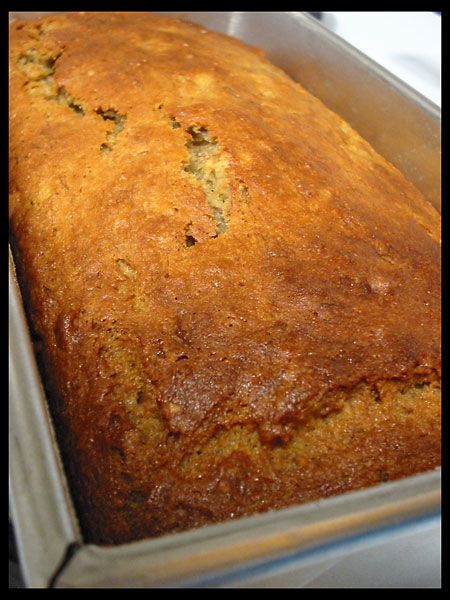
I never expected this to be successful. After my cookie experiences, I was on the verge of being convinced that baking without gluten would never yield a product as tasty as one with. Boy, did this prove me wrong! I love banana bread. You should too.

So I did some research on different flours - Gluten Free, Not Gluten-Freaky has a great rundown of different flour properties and ratios and things. Very helpful. So I just fiddled with my normal banana bread recipe - one used by Cook's Illustrated - and voila! Tender, moist, melt-in-your-mouth (which, OK, is weird for something that doesn't typically melt at all) banana bread. Here goes...

(don't be weirded out by the lengthy ingredient list... you could probably use just butter and the traditional 3-flour blend instead of 5)

BANANA BREAD
1 1/4 cups walnuts, chopped
1/2 cup brown rice flour
1/2 cup soy flour
1/2 cup potato starch
1/4 cup sorghum flour
1/4 cup tapioca starch
1 tsp xanthan gum
3/4 cup sugar
3/4 tsp baking soda
1 tsp baking powder
1/2 tsp salt
3 large extra-ripe, spotty bananas, mashed well
1/4 cup plain yogurt
2 large eggs, lightly beaten
2 tbsp unsalted butter, melted and cooled
1/4 cup shortening, melted and cooled
1 tsp vanilla extract

1. Preheat oven to 350. Liberally grease and flour (with rice flour) the inside of a 9"x5" loaf pan (or similar - it's actually pretty flexible). Cover the bottom with parchment paper.

2. Toast the walnuts on a baking sheet in the oven for 5-10 minutes or until you start to smell them. They should smell good. Not burnt.

3. Whisk together the rice flour through salt in a large bowl, then add walnuts and mix to evenly distribute.

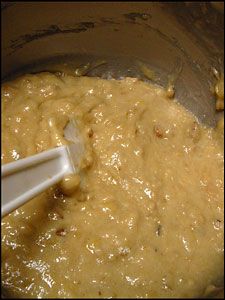
4. Mix together the bananas through vanilla in another bowl, stirring with a wooden spoon. This is fun. Oh, trust me. And it works way better when all your ingredients are at room temperature, so there is nothing to clump the butter and shortening. Because you don't want little pieces of butter and shortening wandering around, do you?


5. Add the wet ingredients to the dry and fold together to incorporate. It should look a little chunky. This is normal. This is good.


6. Transfer batter ASAP to your loaf pan. Stick it on the lower-middle shelf in the oven and bake for 55 minutes - or when a toothpick inserted in the center comes out clean - and it looks ready.


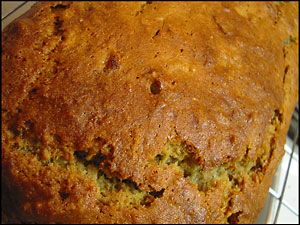
7. Remove bread from the oven and let cool in the pan for 5 minutes before transferring it to a cooling rack. Serve whenever you want to eat it - it is divine when warm and a wonderful breakfast. I didn't try toasting it, but I'm sure it would be great. And oh yeah. It's great with honey.


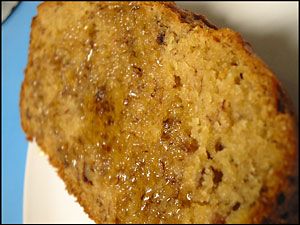
PROS: melt-in-your-mouth, soft, banana-y, sweet but in a good way
CONS: are you kidding me? There's nothing wrong with it...


So there you go. I've only made it once, so I'm sure some improvements/simplifications can be made to the recipe, so feel free to try it out with your own variations... no recipe is final, you know?

17 October 2007

Learning Experience #2: Snickerdoodles


Apparently gluten-free cookies are no easy accomplishment. Not for me, anyway.

OK, so they turned out a little better than the last ones. Definitely tastier. But woah. Flat much? Very breakable, hardly workable dough, and they just plain look sad. But they are killer on ice cream...

I'm still wondering how I managed to fit them in the cookie jar.

Because when I tried to take them out, the cookies were about an inch wider than the opening. Creepy.

Let's get down to business, though, shall we? How exactly did I concoct such a... concoction?

Well, I wish I could tell you - but I wrote over my test recipe (darn) with a second version that I have yet to try. Instead, I'll walk you through the basic procedure.

You start by creaming your fat and sugar together. It should look beautiful and white and fluffy (full of air, you know). Add your wet ingredients like eggs and vanilla and such, beat it, and add your flours and chemical leavening and salt and stuff.

So it should be all stiff and cookie-doughish, right? But it wasn't. It was sticky and soft, like butter that's been out of the refrigerator way too long.

So I froze it for like, 10 minutes. I took it out and rolled it into little balls, tossed them in sugar-spice mixture that I'd made earlier, and set them on parchment paper on my cookie sheet. About 2 inches apart. Should be pleeennnty of space. This, my friends, is where everything goes wrong, so wrong.

Suffice to say that 2 inches was not enough room. These guys like to really expand. And by expand, I mean out. Not up. What I got ended up looking like crispy cyclooctane rings all strung together with their little shared carbons and their lack of personal space.

One thing I can say is that they look a lot better on screen than in person. Not that I didn't see them fit to eat, obviously. They're long since digested, actually...

For the record, I make pretty delicious "normal" snickerdoodles. I'm not just doodle-deficient or anything. But there's more to wheatlessness than meets the eye. I obviously haven't conquered the gluten-free cookie yet. But I will.

You just wait.

15 October 2007

Buckwheat and Corn Pancakes


This was a fun one.

I haven't experimented much (read: at all) with buckwheat before, but it's right up my alley. And yes, buckwheat is gluten-free - it's not wheat at all. It's not even a grass. It's a knotweed with wickedly awesome seeds.

It tastes very earthy, mild yet powerful. The pancakes were dense and filling, but not uncomfortably so. Just buckwheaty and beautiful.

I think next time I'd like to add more corn, though - the flavors really go well together, and with the ratios I tried, the buckwheat flavor all but ate up the corn flavor. I might also add more leavening (baking soda, maybe, with buttermilk instead of milk) to see if it helps the pancakes rise at all.

BUCKWHEAT AND CORN PANCAKES
3/4 cup buckwheat flour
1/4 cup corn flour
2 tbsp cornmeal
1/4 tsp salt
1 tsp baking powder
1 cup milk
1 large egg
1 tbsp vegetable oil or melted butter
2 tbsp honey (molasses is good too; just not blackstrap)
1 cup mixed fresh sweet corn and blueberries (or whatever you wanna stick in there)
butter for the pan
topping of your choice!

1. Combine the dry ingredients in a medium-large mixing bowl. Play with the ratios some (of the flours, anyway), if you like. Even a failed pancake is a good pancake (well, in most cases).

2. Warm your ingredients to room temperature. Put the egg in some warm water (not hot - it will cook), sit a measuring glass of milk in some warm water and stir it, whatever. Honey and molasses are hard to mix into cold things.

3. In small bowl (I like to use a 2-cup liquid measure to save dishes), measure out the milk and the egg, and beat until the egg is nicely broken up and no longer globby. Nobody likes a globby egg; you get big white patches in your pancakes that way.

4. Add the oil to the dry mix and whisk together until it looks good and well-coated, then pour the egg-milk in. Drizzle in the honey and whisk the batter until it looks well-incorporated. Don't overmix it though, or the baking powder will be rendered useless.


5. Let the batter rest while you heat up your skillet. I love a heavy cast-iron pan for pancakes - it gives them a nice, brown exterior. Heat to medium heat and drop in a pat of butter and spread it around to coat. It's good and ready when it bubbles and foams right away but doesn't burn and smoke.

6. Ladle, spoon, or pour some amount of batter (whatever looks good to you) on the skillet. Immediately sprinkle a small handful of corn/blueberries over the top. They'll sink right in.


7. When the edges of the pancake are set and the middle has bubbles, flip it. Do the other side until it's done. It's up to you when it's done - it takes about 2 minutes, depending on the size of your pancakes. I like 'em big.


8. Transfer to a cooling rack or the oven to keep warm, but don't stack them or they'll steam each other. Then they'll be all floppy and moist. Not crispy and wonderful.

9. Serve with butter, maple syrup, or blueberry jam... Yummmmmy!


PROS: homey, hearty, filling, healthy, tasty, great combination
CONS: not very sweet, buckwheat can be is an acquired taste, not enough corn, a little dense


This is based on the recipe from Bob's Red Mill - Down Home Buckwheat Pancakes - with several additions/substitutions. I would make these again. Maybe with some changes, but it's definitely going down in the book.

stuck in the wormhole

I'm still cooking, I swear! But hot dang, I have no spare time to blog. In the coming posts, you can look forward to:

- buckwheat pancakes
- banana bread
- snickerdoodles (another learning experience)
- apple pie
- pumpkin filling cookies
- Araya's Vegetarian Place

Comment if you wanna see any of those more than the others, so I can post that first.

Well, I'm now a month gluten-free, and doing fine. Although, my eczema is still here. In fact, it hasn't changed a bit. *sigh* I'm a little bit addicted to the challenge of a gluten-free existence, though, and feel a heap healthier. Learning to bake again is a ball. I wish I had one of those commercial kitchens with the big mixing equipment and the calibrated oven and huge sinks for washing dishes with one of those sprayer things... and large bags of gluten-free flours and such. And fresh fruit up the yin-yang... Really, though, I'd settle for a nice KitchenAid.

I'm discovering all sorts of cool grains... Quinoa I've got down. Millet I'm currently conquering... next is amaranth.

I'm trying to like millet. But right now, I think it smells like budgies... :-S

05 October 2007

Bananas, Almonds, and Hot Fudge


Bananas are fun. You can whirl them in the blender for a smoothie. You can eat them like a monkey. You can chop them for fruit salad. My latest favorite? Fryyyyy them :D

So, OK, fried banana. I thought it would make a good dessert because... you know, bananas are healthy. *grin* Oh, but you know what would be good with it? Hot fudge. Oooh! And toasted almonds! Man, I was so excited when I thought of all this and realized the ingredients were on hand. Stoked. So I got everything together, Robert fried up the bananas (he being the master of anything that's heated in a pan with fat), and put them all together. It needed a mint leaf. Which we didn't have.

So I used a basil leaf. Shh, don't tell anyone. Basil actually tastes good with chocolate... *shifty eyes*

BANANAS, ALMONDS, AND HOT FUDGE
1-2 tbsp butter
2 large bananas, ripe but not TOO ripe, peeled
4oz dark chocolate
3 tbsp milk or cream (we used lowfat lactose-free, since that's what was on hand)
2 tbsp butter
2-3 tbsp sugar
pinch salt
1/2 tsp vanilla
1/4 cup sliced almonds, toasted
mint sprig(s) for garnish


1. Heat butter in a 10" skillet over medium-low heat. Slice bananas in half lengthwise.

2. When butter begins to foam, add bananas to pan, cut side down.

3. Meanwhile, place chocolate, milk, butter, sugar, and salt in a glass bowl or top half of a double boiler. Place over a pan containing about an inch of gently simmering water.

4. When bananas are lightly golden brown on one side, gently (and quickly) flip them over to brown the second side.


5. Stir chocolate with a spatula until it melts and mixture looks homogenous. Dip your finger in it and taste it. Add whatever you think you need (sugar, milk, butter). Repeat once with all 9 other digits. Add vanilla at the very end and stir to incorporate, then take off the heat.


6. Remove banana halves from pan when browned to your liking and put on a serving plate. Drizzle some fudge sauce over the top, sprinkle on your toasted almonds, drizzle some more fudge sauce over them, and garnish with mint. Oh, boy.


PROS: Hard to go wrong with this one, unless you over-toast your almonds or something... versatile, you can make your chocolate how you like it, and put as much or as little on as possible. Bananas are healthy!
CONS: uh... not good if you don't like chocolate. Or bananas. Or nuts.

03 October 2007

Pan-Seared Sea Scallops


I am not a true vegetarian. I don't eat beef, chicken, pork, turkey, lamb, goat, duck, rabbit, lizards, or most other vertebrates. But I do eat seafood (so that would make me... a pescetarian?). And I love me some mollusks.

Friday night, we cooked. Delicious scallops, salad, and dessert was had - more about the latter two in future posts - and all was devoured devilishly. Good times. Of course, a large (nearly full) bottle of extra-virgin olive oil was shattered all over the floor... but lucky for us, we'd already made salad dressing. *wipes brow* Anyway, onto the main course.

Sweet, succulent scallops are excellent served as an appetizer or as the main feature of a meal. High heat and a short cooking time ensure they will form a golden, flavorful exterior and remain tender inside (I sound like a cookbook in a good way, right?).

PAN-SEARED SEA SCALLOPS
12 large sea scallops
2 tbsp olive oil
1/2 tsp sea salt
1 1/2 tbsp butter
3 tbsp lemon juice
1 1/2 tbsp capers
1/4 cup chopped flat-leaf parsley
Freshly ground pepper to taste

1. Heat a 10"-12" heavy skillet over medium-high heat.

2. Pat scallops dry on paper towels. Coat well with olive oil and sprinkle with sea salt.


3. When pan is hot, add scallops as quickly as possible. Do not move scallops once they've been placed in the pan. Sear two minutes or until golden brown on bottom.

4. Turn scallops with spatula. Again, do not move scallops once they've been turned. Cook approximately two more minutes. To test for doneness, press the top of a scallop with your finger: when you begin to feel resistance, remove from heat immediately and transfer scallops to a serving dish.


5. Deglaze the pan by adding butter, lemon juice, capers, and parsley. Stir to mix and remove stuck-on bits (the fond) from pan. Spoon over scallops and serve hot, seasoning to taste with pepper.


Did I mention that we ate them all up?


PROS: exquisite, versatile dish, flavors compliment each other well
CONS: very easy to overcook scallops; scallops tend to stick to the pan, scallops are expensive